How to Set Up a Harvest Pipe
- Nikki DeMoville (Unlicensed)
Note: These instructions are for Bepress Digital Commons, but many steps will apply to any harvest pipe.
Basic Information
Useful Orbis Cascade instructions to start with: https://www.orbiscascade.org/blog/9/?bid=153
![]() Important to know before you begin:
Important to know before you begin:
- Go in order: source, scope, norm rules, then pipe last.
- Deploy after every step, and Deploy All before running the pipe for the first time.
- Records will not be discoverable in OneSearch until indexing is run for the entire installation. The pipe is for our local instance, but the records are still added to a single installation-level database, which is all indexed at once.
- View harvested records in the PNX viewer at any time after the pipe finishes. Search using [source code*] in Record ID. Adding date/time to Created after or Updated after will make the search go much better (it's super slow otherwise). Put date AND time (e.g. 05/03/2017 01:01) or it won't work.
Procedure
Data Source
Note that the input path is oai_dc:dc, despite the fact that we harvest qualified DC data.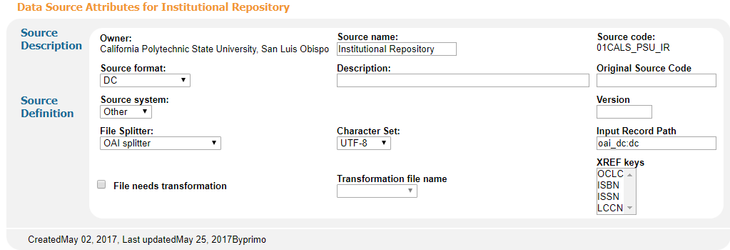
Scope
To view records in Primo, you have to create a scope, and then put that scope in a view. The scope needs to be named the same thing as your source, because the OTB norm rules are already set up to write the source as a scope value in the PNX.

Add the scope to any view where you want the IR records to be in your search results. One Ex Libris trainer defined the scopes you build in the Views area as "scope buckets." They're called scopes, but they're really containers of one or more scopes. You can add your IR as a separate scope bucket so it will be searched in a separate tab/dropdown, or add it as a value to an existing scope bucket so the results are just automatically included with whatever else it's searching.
Separate scope bucket: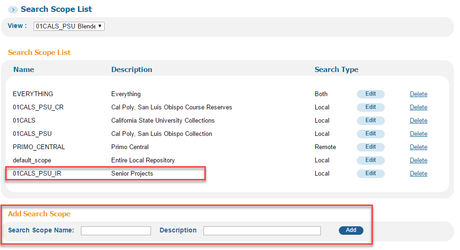
Add to existing scope bucket: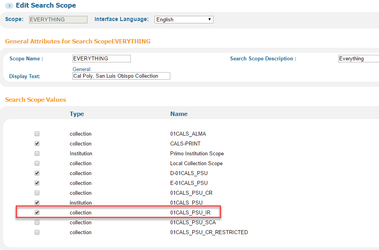
If you added it to an existing scope bucket, you're done. If not, you need to choose which tab to put it in, click Edit, and then Add a New Scope: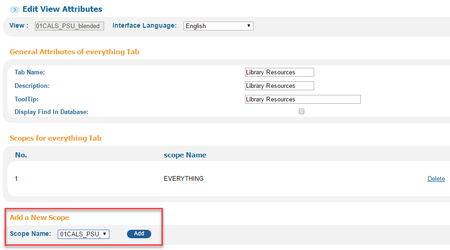
Norm Rules
Duplicate from Generic Dublin Core. Start with the Orbis Cascade recommended changes. For an example of modified norm rules (for local additions and to adapt to Qualified Dublin Core) see here: Example of DC Norm Rules Changes for Institutional Repository Harvest
Test records: Load a harvested file, or do this quick-and-dirty method:
- From the Norm rule sets screen, click Test
- Choose any of the demo records under File Name
- Under Duplicate File at the bottom of the screen, add a new file name and click the Duplicate button
- Click the Edit button and paste in an XML record from your IR.
Generic method to get an XML record:
- Simple DC:
- http://[base digital commons URL]/do/oai/?verb=GetRecord&metadataPrefix=dcs&identifier=oai:[base digital commons URL]:[name of set]-[digital commons article ID]
- Specific examples:
- Qualified DC:
- http://[base digital commons URL]/do/oai/?verb=GetRecord&metadataPrefix=dcq&identifier=oai:[base digital commons URL]:[name of set]-[digital commons article ID]
- Specific examples:
It may be necessary to view the source for a record before in order to find the article number. In the case of Digital Commons, it appears to be an accession number, which is different from our URL. Note that context=[name of set].
- It looks like this in the source: <meta name="bepress_citation_pdf_url" content="http://digitalcommons.calpoly.edu/cgi/viewcontent.cgi?article=1004&context=wvisp">
Pipes
Three pipes are needed:
- Regular
- Used for harvesting
- Delete DS
- Used to delete records if necessary for a completely fresh start
- No Harvest
- Update the records without re-harvesting. Use after any change to norm rules.
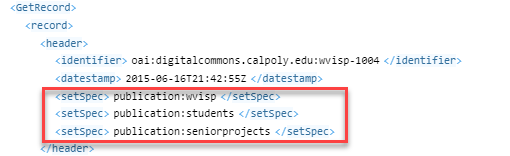
Determine whether to harvest the whole source or a smaller set. Set names can be found in the header when viewing an XML record:
Pipe configuration for Digital Commons:
- Data Source: Institutional Repository
- Harvesting Method: OAI
- Server: http://[base URL]/do/oai/
- Metadata format: qdc
- Set: exact name of set as found in XML header (e.g. "publication:students")
- Start harvesting files/records from: (use date of oldest content; auto-updates to most recent harvest date)
- Start time: (default)
- Normalization Mapping Set: your new norm rules
- Enrichment Set: No Enrichments - Template
- Harvested File Format: *.tar.gz
- Include DEDUP (checked)
- Include FRBR (checked)
- Force DEDUP (checked)
- Force FRBR (checked)
- Maximum error threshold: 5% (default)
Example of Regular (harvest) pipe:

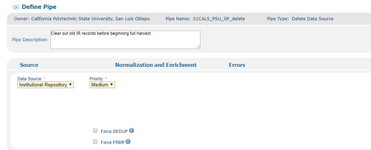
Example of Delete pipe:
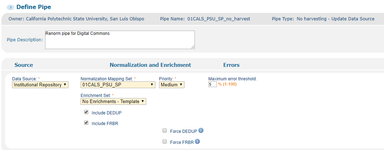
Example of No Harvest (renorm) pipe:
Deleting a pipe:
- A pipe that has never been executed can be deleted in the Back Office. If the pipe has ever run, only Ex Libris can delete it–open a Salesforce ticket for this.
Stages of pipe execution:
- Harvesting
- NEP - normalization and enrichment
- Dedup - only dedups records from this source (not with Alma records)
- FRBR - only for this source (doesn't group with Alma records)
Note that a status of completed when Stage still says "harvesting" isn't necessarily an error–it can mean that there were no new records in the source available for harvesting, so the job ended there.

Additional Back Office Configuration
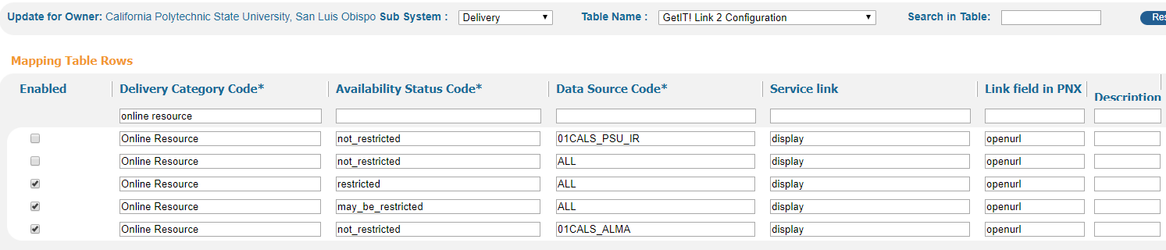
If an extraneous and non-functional link appears in the GetIT! 2 (At the Library) section of your records, here is how to remove it without disturbing possibly necessary GetIT! 2 link functions for Alma records.
- ADD row, ENABLED: Online Resource not_restricted 01CALS_ALMA display openurl
- ADD row, NOT ENABLED: Online Resource not_restricted /[your data source code] display openurl
- DISABLE row: Online Resource not_restricted ALL display openurl
- You must ADD a row for every data source if you take this approach.