End of Term/End of Course Workflow
Two jobs are scheduled to run run daily:
- Activate/Deactivate Courses
- Restore Temporarily Shelved Items
which means that when the course end date is reached the course information should no longer show up in Primo, and that items on the expired course/reading list items will appear on the Pick From Shelf List.
To identify items that need to be pulled from the Course Reserves shelf. We have come up with two options:
1) Pick From Shelf List
- Resource Requests → Pick From Shelf
- Limit Results to: Request/Process Type: Restore item
- Check Select All
- Click on Tools then Excel. You will get a list of Title, Location, and Call Number. There are a couple of challenges with this list:
- It does NOT list barcodes which is confusing when you have multiple items of the same title. According to ExLibris, there is no way to get a list that includes barcode.
- Course Code is not included so for institutions who shelf items by course code, this list will not work.
--OR--
2) Analytics Report in Course Code order. You just need to create the report once and then save it for reuse; however, you will need to modify the Course End Date start and end in the Filter each time you run it!
First Time Setup:
Analytics → Design Analytics
New → Analysis → Course Reserves
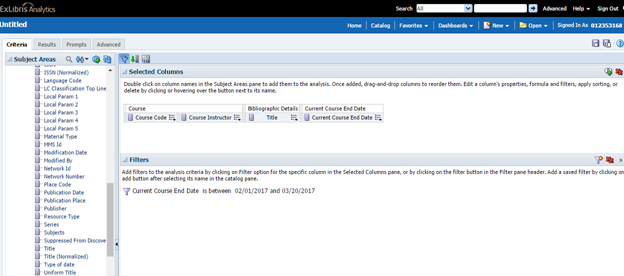
Criteria
- Course
- Course Code
- Course Instructor
- Bibliographic Details
- Title
- Current Course End Date
- Current Course End Date
- Course
Filter
- Click on the little down arrow on Current Course End Date. Select Filter.
- Operator: is between
- Value: Beginning of term (just to catch any that may have expired and not been removed)
- Value: Today’s date
- When criteria and filters are set, click on Results to verify the report is what you need. Modify if necessary.
- Save the report for future use by clicking on the save icon at top right of page. Name the report. Save in the shared drive of your institution.
- Click on little down arrow next to Favorites at top of page. Select Add to Favorites.
Subsequent Use:
Analytics → Design Analytics
Click on Catalog at top of page.
Locate Report in list of Favorites.
Click on “Edit” under report name.
Click on Criteria.
Click on the edit (pencil) icon on the filter. Update the start and end date Values for the term. Click OK.
Click on Results. Print report if desired.
When you have the list that works best for you:
- Pull the items on the list from the course reserve shelve.
- Resource Requests → Scan In Items
- Place cursor in the Scan item barcode field and scan barcode of each item. This will move the item back to its permanent Alma location.
- Return personal copies to instructors.
- Reshelve library items.