Suppressed Items
- Sarina Sinick (Unlicensed)
In Alma, individual record suppression can be done either at the bib or holdings level. There is no way to individually suppress item records in Alma.
Entire location codes can be suppressed in Alma. For instance, if you suppress laptops from discovery, you could suppress the location "lap" to suppress all items that are in this location. Because suppression can happen at the location level, you can also make use of the temporary location feature in Alma to assign a temporary suppressed location to suppressed items in Alma.
By default, all items will migrate to Alma as regular (non-suppressed) items. In order for suppressed items to appear suppressed in Primo, you can take one of these approaches. Expand the selection to view the exact steps required for each method. Note that for options (1) and (2), I can perform all post-migration tasks on your behalf. If you would like me to do so, please contact me at ssinick@calstate.edu to let me know your selection.
Pre-migration, export a list of barcodes that fit your current item suppression criteria from Millennium/Sierra via Create Lists. Post-migration to Alma, upload these barcodes to Alma to create a set in Alma. Run a job on this set to update the temporary location of these items to a suppressed location.
Pre-migration to Alma:
In Millennium/Sierra, navigate to Create Lists.
Select Search Records and add the criteria to create a list of all the suppressed items on your system. For instance, if a library suppresses items when the item has an ICODE2 value of 'n', 'l' or 'z', then you would create a list where ICODE2 is equal to 'n' or ICODE2 is equal to 'l' or ICODE2 is equal to 'z'.
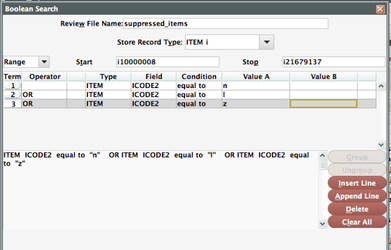
Select Search and wait for your list to complete. Click on Export Records and select the Type ITEM and the field BARCODE. Browse for your file output location, and enter in your output file name such as "suppressed_items".
Click on Text qualifier and select None. Click Ok. Change the extension of the file to ".csv" and open the file and change the header in your file to "Barcode".
Your file should look like this
Barcode
30250093807092
30250014535293
Post migration to Alma:
Navigate to Manage Sets and select Add Set. Choose Itemized as your set type.
Name your set ("Suppressed items") and change your Set Content Type to Physical Items.
Under Add Contents from File to Set click on the browse icon. Select the csv file of barcodes that you created in the first section.
Click Save. You now have a set of all items that were suppressed from display in Millennium/Sierra.
In order to suppress this set of items, you can update the temporary location for all items in the set to a suppressed location. You may want to create a new location (i.e. "suppressed") in order to handle item-level suppression. Once you have a suppressed location that you can use to suppress these items, do the following:
Navigate to Run a Job under Manage Jobs.
Select the job Change Physical Items and select Next. Select the set that you just created "Suppressed Items" and select Next.
Select the Change Type Temporary. Select a New Library and New Location that is a suppressed location ("suppressed").
Pre-migration, include your suppression criteria (e.g. ICODE2) in your Millennium and Sierra (III) Field Mapping form for migration to Alma. Post-migration to Alma, create sets for each value that is a suppressed code in your current system (for instance ICODE2: n or ICODE2: w). Run a job over this set to update the item temporary location to a suppressed location
Prior to migration:
- On your Millennium and Sierra (III) Field Mapping Form, ensure that you have placed your ICODE2 value in NON_PUBLIC_NOTE_1 , NON_PUBLIC_NOTE_2 or NON_PUBLIC_NOTE_3.
Post migration to Alma:
Navigate to Manage Sets and select Add Set | Logical.
Name your set and select Set content type to Physical Items. Select Next.
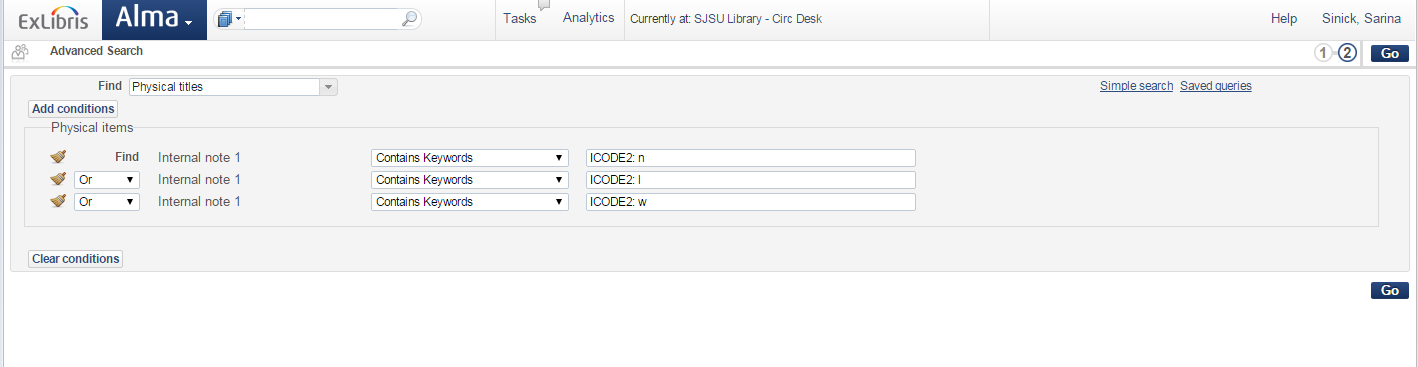
Click on Advanced Search and select Add Conditions.
In this example, ICODE2 was mapped to NON_PUBLIC_NOTE_1 on the Millennium and Sierra (III) Field Mapping Form, so the criteria Internal Note 1 is selected. Select the appropriate internal note number. Enter Contains keyword “ICODE2: n” to find items that had the value ‘n’ in the ICODE field.
Add the criteria for each suppression value that you used in Millennium/Sierra. For example, if you suppressed items with ICODE2 equal to ‘n’, ‘l’ or ‘z’, then your Alma Advanced search screen would look like this:
Click Save in the top right-hand corner of the screen to save a list of these items as a set.
In order to suppress this set of items, you can update the temporary location for all items in the set to a suppressed location. You may need to create a new location (i.e. "suppressed") in order to handle item-level suppression. Once you have a suppressed location that you can use to suppress these items, do the following:
Navigate to Run a Job under Manage Jobs.
Select the job Change Physical Items and select Next. Select the set that you just created "Suppressed Items" and select Next.
Select the Change Type Temporary. Select a New Library and New Location that is a suppressed location ("suppressed").
Pre-migration (in your current system) update all suppressed items to a suppressed location. Mark this location as a suppressed location in the locations tab of the Millennium and Sierra (III) Migration Form.
Pre-migration to Alma:
- This method is not recommended. Only select this method if you wish to change the permanent location for all suppressed items on your system.
- In Millennium/Sierra, navigate to Create Lists.
- Select Search Records and add the criteria to create a list of all the suppressed items on your system. For instance, if a library suppresses items when the item has an ICODE2 value of 'n', 'l' or 'z', then you would create a list where ICODE2 is equal to 'n' or ICODE2 is equal to 'l' or ICODE2 is equal to 'z'.
- Save your review file with the name "Suppressed items" or something similar.
- Navigate to Rapid Update and select the record type Item. Select the review file "Suppressed items" that you created in step 2.
- Select the Field "79 Location" and select a suppressed location as the Value. Click Start. In your Millennium and Sierra (III) Migration Form, select Yes under the column Is Suppressed? for this location.