Course Reserve Workflow
- Kevin Phillips (Unlicensed)
Following are procedures for setting up course reserves, editing, and removing reserves as well as tips from those who process reserves.
Add Course Preparation
Before adding a course—make sure it doesn't already exist.
- FULFILLMENT>Course Reserves>Courses
- Enter the Course Code in the search box and hit enter
- If the course is existing and active, proceed to Putting the Materials on Reserve
- If an instructor is using the same materials as an existing course/reading list, go to the Instructor tab of the existing course, and add/change the instructor
- If the course is existing for that instructor, but inactive you will need to reactivate the course (see Reactivating an Expired Course below)
- If the course is existing but has a different instructor/materials, proceed to Add Course
- If course is not found, continue with procedure to Add Course
Add Course
- FULFILLMENT>Course Reserve>Courses>Add Course
- Course Information tab
- Code: Enter course code
- Name: Enter course name
- Section: Course section (Tip: If you have the same course code taught by different instructors that use different materials. Some campuses have found it most useful to use instructor last name as section.)
- Academic Department (optional): Select appropriate department if using. (These have to be pre-setup in a table: Configuration>Fulfillment>Courses>Academic Departments)
- Terms list (optional): Select term if using (These have to be pre-setup in a table: Configuration>Fulfillment>Courses>Course Terms)
- Processing Department (mandatory): Select the processing department. (It has to be pre-setup in a table: Configuration>Fulfillment>Courses>Processing Departments)
- Status: Do not change—Alma sets it automatically
- Start Date: This defaults to current date—change if you want a future date.
- End Date!!!IMPORTANT!!!
- This defaults to current date so be sure to change it!
- This should be set to the day AFTER the last day they will be on reserve, so the materials will circulate correctly on that last day of the course
- Double check this date! It will be pulled to the reading list and the due back date for course materials
- **For indefinite reserve period, set the date to way out in the future and wait until the professor asks for materials to come off reserve.
- The remaining fields are optional
- Instructor tab (optional)
- For each instructor
- Add instructor
- Instructor: Type instructor name to search Alma users and click on desired name
- Add instructor
- Campus tab (optional)
- For each campus
- Add Campus
- Select Campus from dropdown menu
- Enter number of participants if desired
- Click Add Campus
- Save
- For each campus
- For each instructor
Add Reading List
- Click on “…” next to the course and select Reading List
- Add Reading List
- Code: Course code of the course, but append the section number if you filled one in on the course (Tip: Appending a section number or instructor name will make it easier to find the correct reading list in the Scan In Items screen later. It is often confusing if you have multiple reading lists with the same course name.)
- Name: Same as course name
- Status: Complete (Tip: Set it now so you don’t forget to change the status later)
- Due Back Date: This will be pulled from the course end date
- Add and Close
- Click on “…” next to the Reading List you just created and select Reassign
- From the dropdown, select your name or the person who will be working with the list (Tip: This makes it easier to find the reading lists as the default for Reading List Task List is ‘Assigned to Me’).
Putting the Materials on Reserve
Personal/Instructor Copies
If the item has a barcode, check to see if it is in the system already.
- In the Quick Search box, select “Physical items” and “Barcode”, then scan barcode into the search box. If the item is found, skip to Adding Library and Previously Created Personal/Instructor Items to Reading List Otherwise proceed with Create Citation for New Personal/Instructor Items.
Create Citation for New Personal/Instructor Items
This step creates brief records for non-library items that are not already entered in Alma.
- Go into the Reading List:
- FULFILLMENT>Course Reserves>Reading Lists
- Use the search at the top of the page to locate the appropriate Reading List. (Tip: The default is “Assigned to Me” so if the list is not assigned to you, click on the “All” tab and search.)
- Click on “…” next to the appropriate reading list and select Work On
- Once you are in the reading list, chose Add Citation>Add Brief.
- Default is Citation Type: Physical Book--leave that alone and click “Choose”
- IMPORTANT! Complete the following BEFORE doing anything else so you don’t forget:
- Placement of new record: check INSTITUTION -- NEVER select Network thought it is the default setting!***
- Course restricted: Check this box
- Suppress from Discovery: Check this if you don’t want it to be discoverable in Primo.
***Tip: If you mistakenly create a brief record in the NZ, there are instructions in the Fulfillment Workflows: Clean Up of Brief Records in NZ.
Resource Information:
- Title: Enter title of book
- Author: Enter author as you want it to appear in the citation.
- Edition: Enter edition.*
- Call Number: Enter call number using your institution’s convention.
- Barcode: Do NOT enter barcode in this section-it will be entered at the item level
- Note: Only enter notes if you want them to appear in the OneSearch display as a description
- Volume: Enter volume here.*
*Tip: Some campuses found it helpful to put the volume and/or edition as part of the title field because when you look at a reading list, you cannot see that information on the brief record citations.
Item Information:
Tip: You can put instructor copies into a permanent location of “Inactive.” This serves multiple purposes – it is a suppressed location so you can keep personal copies in the system even when they are not currently being used without having to delete and recreate the record each time it goes on or off reserve. It also allows you to set a due back date, so the item will appear on the RESTORE pick from shelf list when it is due to come off reserve. Configuration details below.
- Location: Select appropriate library if prompted and then select the location “Inactive”
- Barcode: Scan this LAST because that will save the record
- You should see the citation in the reading list
Actions You May Need to Take After Creating a Brief Item Record
Add a popup note
Popup notes are useful to prompt staff to check inside case for DVD or for items with multiple pieces.
- Click on the ‘…’ next to the citation in the reading list and select Items
- Click on the ‘…’ next to the item and select Edit
- Click on the Notes tab
- In the Fulfillment note box, type: “Check inside case for DVD” or whatever pop-up note is appropriate
- Save
Creating Multiple Copies of a Personal Item
- Click on the ‘…’ next to the citation in the reading list and select Items
- Click on the ‘…’ next to the item and select Duplicate
- Scan in barcode
- This will save the additional copy with the new barcode
Next Step
Once you have the brief items created in the Permanent location of Inactive, you need to put them in the temporary reserve location and optionally assign the temporary item policy. Follow the steps for Adding Library and Previously Created Personal Items.
Adding Library and Previously Created Personal/Instructor Items to Reading List
This step adds the item to the reading list, puts the item in the temporary course location, and sets the item policy. Items must already exist in Alma. If you have personal copies that are not in the system, go back to the step to Create Citation for New Personal/Instructor Items.
- FULFILLMENT>Resource Requests>Scan In Items>Change Item Information tab
- Change Type: Temporary
- Due Back: Leave this blank to have it pulled from the reading list. Enter a date only if you want to override course end date
- Location: Select appropriate course reserve location
- Reading List: Click on the list icon and then search on reading list code or name, etc.
- Click on the appropriate reading list
- Item Policy: Select the appropriate reserves item policy if using
- Place cursor in Scan Item Barcode and scan in the item (Tip: When you put the cursor in the Scan Item Barcode box it often puts a space before the barcode. You may want to backspace in the box just in case before scanning the barcode. Otherwise if you may get an error message and have to rescan or hit the OK button to retry.)
The items are now ready to be shelved in the course reserves location.
Configuration of Inactive Course Reserves Location
Locations are set at the library level!
- Set up the Inactive location as follows:
- Alma Configuration>Fulfillment
- Configuring: Select the LIBRARY that will contain the location*
- Locations>Physical Locations>Add Location
- Code: inactive
- Name: inactive/suppressed personal reserves
- External Name: inactive/suppressed personal reserves
- Type: closed
- Remote Storage: leave blank
- Fulfillment Unit: select the fulfillment unit that you use for reserves
- Call Number Type: leave blank
- Map: leave blank
- Click on Add Location
- Click on the “…” next to the inactive location you just created and select Edit
- Check the box next to Suppress from Discovery
- Save
- At the main Alma configuration menu, change “Configuring” back to the institution level
-
- If you don’t already have one, set up a TOU with a Policy Type for Is Loanable = Not For Loan
-
- Alma Configuration>Physical Fulfillment>Fulfillment Units>Reserves>Fulfillment Unit Rules>Add Rule
- Name: Inactive Reserves
- Description: Personal copies that have been returned to the instructor
- Input Parameter>Add Parameter
- Name: Location
- Operator: =
- Value: Select the appropriate library and then the inactive/suppressed personal reserves location
- Save
- Output Parameters -> Terms of Use: Select the TOU you set up for “Not For Loan”
- Save
- Use the Move Up arrow to move this new rule into the top (1) position
Reactivating an Expired Course
Use this procedure to restart a course that has passed the expiration date.
- Course>Edit>Change End Date to new date
- Make any changes on Instructor and Campus tabs if necessary
- Save
- Click on “…” next to the course and select Reading List
- Click on “…” next to the Reading List and select Work On
- If any citations are no longer being used, click on “…” next to the citation and select Remove
- If you have personal/instructor copies that are not already in Alma, proceed to Create Citation for New Personal/Instructor Items
- If you have library items or personal/instructor copies already existing in Alma, go to Adding Library and Previously Created Personal/Instructor Items to Reading List
Extending the End Date of an Active Course
Use this procedure if an instructor wants to change the end date of a course that is currently active, e.g. extend the course an additional term. You must change the date in the course, reading list, and each item record in each citation!
- Edit the Course:
- Fulfillment>Course Reserves>Courses
- Enter the Course Code in the search box and hit enter
- Click on the “…” next to the course and select Edit
- Modify the End date to the new end date
- Save
- Edit the Reading List:
- Click on the “…” next to the course and select Reading List
- Click on the “…” next to the reading list and select Work On
- Modify the Due Back Date to the new end date
- Save
- Edit the Citations
- Click on the “…” next to the reading list and select Work On
- For each citation in the reading list:
- Click on the “…” next to the citation and select Items
- For each ITEM
- Click on the “…” item and select Edit
- Scroll to bottom of page under Temporary Location Information and change the Due Back Date to the new end date.
- Save
- Back
- When all citations are modified, click Save
Ending active courses or removing materials from an active course
Use this procedure to take materials off reserve while the course is still active. If all materials are removed, there are procedures to “expire” the course. Otherwise, leave the course active so remaining materials can circulate. This is useful when instructors come to pick up materials early!
- Use the Course Reserves search to see what items are on reserve and make sure they are all showing up with a status of “item in place”
- If not, you either need to get all items back before proceeding or make sure you have a way to remember to deprocess the loaned items when they are returned.
- Retrieve the items from the shelf
- Go to Scan in Items>Change item information
- Change Type: RESTORE
- Scan in barcode of each item
- Give personal copies to the instructor
- Place library copies in appropriate reshelving location
Clean up the Course and Reading List
If removing only some items but not ALL items for the course, remove the citations that are not needed from the reading list so they don’t show up in the course reserve search in the “inactive” location.
- Fulfillment>Course Reserves>Reading Lists
- Click on “…” next to the reading list and select Work On
- Click on “…” next to the citations no longer needed and select Remove
- Locate item to be removed. Click on “…” and select “Remove”
- Confirm
- Save
If ALL items for course are being removed, expire Course/Reading List
Course will not show as inactive until the nightly job runs.
- Fulfillment>Course Reserves>Courses
- Locate course, click on “…” and select Edit
- Change End date to current date
- Save
- Next to the course, click on “…” and select Reading List
- Click on “…” and select Work On
- Change Due Back Date to current date
- Save
End of Term Procedures
At the end of a term, there are usually a large number of courses that expire and items that need to come off reserve.
Two jobs run daily:
- Activate/Deactivate Courses
- Restore Temporarily Shelved Items
The courses that have expired will become inactive and any items “due back” will be get a Restore Item process type. When they are scanned, they will change from a temporary location to their permanent location.
- Identify and pull items due to come off reserve:
- Fulfillment>Resource Requests>Pick from Shelf List
- Go to Facets under Request/Process Type, click on Restore item
- Pull those items from the course reserve shelves
- When you have the items, scan them in Alma. This will change the item record field Item is in temporary location=No
- Fulfillment>Resource Requests>Scan In Items
- Place cursor in the Scan item barcode field and scan barcode for each item.
- Check after EACH scan that the Destinations is the “permanent” Alma location. If Destination is a course reserve location, it’s possible the item was not due to come off reserve. You will need to investigate.
- Double check that all items “due back” were processed:
- Fulfillment>Resource Requests>Pick from Shelf List
- Go to Facets under Request/Process Type, click on Restore
- If any items are found, check to see if they should have been removed and just didn’t get pulled/scanned
- Process them as shown in the previous step
- Library materials should be shelved in the permanent location
- Personal/ Instructor copies (now in Inactive location) can be returned
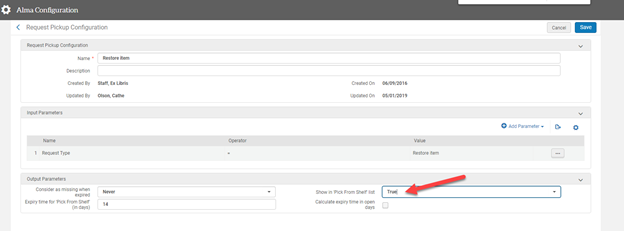
Note: In order to have Restore items show up on the Pick From Shelf list, go to Configuration>Fulfillment>Physical Fulfillment>Request Pickup Configuration. Click on the “…” next to Restore item and select Edit. Set Show in ‘Pick From Shelf’ list to True.
**Tip: Because it is so easy to make errors when extending and reactivating courses, some campuses have stopped using course end date and just leave things on reserve until the instructor asks for materials to be taken off reserve. Alma does require an end date when creating courses, so these campuses make the end date 20+years into the future.
Extra checks
In Analytics
- Shared Folders/Community/Reports/Institutions/CalState/Fulfillment/Verified Reports/Course Reserves: Items No Longer on Reserve
- Use the OPEN option so you get the prompt to select your course reserve locations
- Go through each item and figure out if it should be on reserve or off