...
- Go to Alma > Administration > General Configuration > Letter Emails
- Find the letter you want to edit > Click Actions > Edit
- Find the addressFrom Code and add your label and the email address.

- Save the change, then send the letter out again. You should see something like this:

For more information:
How to create a "My Account" Link in emails
...
- Go to General Configuration > Configuration Menu > Other Settings
- Find the email_my_account parameter and add the direct link to your log in page. If you are finding that your page is not linking directly to the log in page, make a one small edit and replace "search" or "login" with "account": https://sjsu-primo.hosted.exlibrisgroup.com/primo-explore/account?vid=[your school code]&sortby=rank&lang=en_US. For your convenience, I have included some parameters that you may have wondered needed may or may not need editing.
8. Email contact: ex libris does not use this field anything. In fact, if you try to edit it, it will tell you it can't save it.
9. email_contact_us: You can put an email or link in here. We linked out to our Ask a Librarian page.
10. email_deposit_contact: Ex Libris does not use this field. Do not customize.
11. email_deposit_sender: Not in use
12. email_my_account: this is what the My Account link in the footer will link out to. We linked to our OneSearch page. unfortunately, our page doesn't have a static url that goes directly to log in. You just have to know to log in via the link in the top right. Not sure if yours is different but that's how ours works.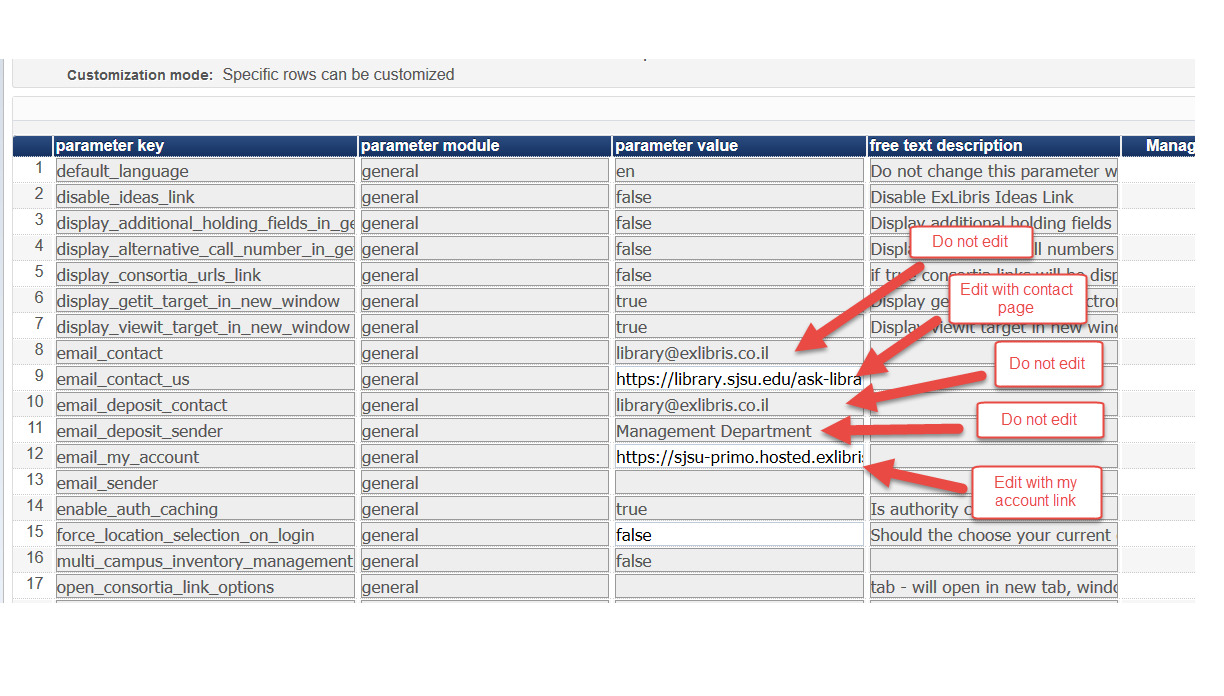
- For each letter, you will need to edit your footer to include these links. Go to General Configuraton > Configuration Menu > Customize letters > Find the letter you want to edit > click customize > edit > replace the footer.xsl area with this code:

- Click save and send out a test letter. Your letter should now have the account link included.
How to Add a Social Log In to Your Letter Footer
Note: this may not work for Gmail users
- Add this section to your footer.xsl. Replace all links with your own library's week.
<xsl:template name="socialMediaLinks">
<div align="center">
<a href="https://www.snapchat.
...
Step-by-step guide
Step-by-step guide
...
Related articles
| Filter by label (Content by label) | ||||||||||||||||||
|---|---|---|---|---|---|---|---|---|---|---|---|---|---|---|---|---|---|---|
|
...
| hidden | true |
|---|
...
com/add/sdsulibrary">
<img src="http://tylerrogers.sdsu.edu/social_logos/Snapchat-crimson.png" alt="SDSU Library on Snapchat" style="width:42px;height:42px;border:0;"></img>
</a>
<a href="https://www.facebook.com/SDSULibrary">
<img src="http://tylerrogers.sdsu.edu/social_logos/Facebook-crimson.png" alt="SDSU Library on Facebook" style="width:42px;height:42px;border:0;"></img>
</a>
<a href="https://www.youtube.com/channel/UCRPX9VGLzTkJB0HjPNo3ABw">
<img src="http://tylerrogers.sdsu.edu/social_logos/Youtube-crimson.png" alt="SDSU Library on Youtube" style="width:42px;height:42px;border:0;"></img>
</a>
<a href="https://twitter.com/sdsulibrary">
<img src="http://tylerrogers.sdsu.edu/social_logos/Twitter-crimson.png" alt="SDSU Library on Twitter" style="width:42px;height:42px;border:0;"></img>
</a>
<a href="https://www.instagram.com/sdsulibrary/">
<img src="http://tylerrogers.sdsu.edu/social_logos/Instagram-crimson.png" alt="SDSU Library on Instagram" style="width:42px;height:42px;border:0;"></img>
</a>
</div>
</xsl:template>
2. Add this section in the .xsl file of the letter that is to be sent:
<!-- footer.xsl -->
<xsl:call-template name="lastFooter" />
<xsl:call-template name="myAccount" />
<xsl:call-template name="contactUs" />
<xsl:call-template name="socialMediaLinks" />
How to Add an IF/WHEN Statement to Your Letter
This applies to letters where you only want certain information to be sent to a patron based on certain criteria. In the below example, a line of text is added for only specific patron groups.
- Add this to to the letter you are editing and change the wording/patron groups as you see fit.
<!-- Send a message only to undergraduates about returning books. -->
<xsl:choose>
<xsl:when test="notification_data/item_loan/user_type='UNDERGRADUATE'">
<h><b>A HOLD has been placed on your academic record until the item is returned and/or all charges on your library record are paid.</b></h>
</xsl:when>
<xsl:when test="notification_data/item_loan/user_type='GRADUATE'">
<h><b>A HOLD has been placed on your academic record until the item is returned and/or all charges on your library record are paid.</b></h>
</xsl:when>
<xsl:otherwise>
<h><b>Please contact us if you have questions or need assistance.</b></h>
</xsl:otherwise>
</xsl:choose>