Save all the files together in a folder where you will be able to easily find it on a daily basis. To add the name of your library and OCLC code to the template, open the document and click “No” in the resulting popup. Add your university name and OCLC in the space called “Library Name Here” and “OCLC Code Here.” Save the document.
CleanSlips 4.5 Updates
Call Number Sorting: Many people requested that the slips be pre-sorted by call number, to allow for easy searching in the stacks. This wasn’t initially possible, because of the way Excel sorts LC call numbers. This was fixed this by creating a normalization routine that transforms call numbers into a format Excel can understand and sort.
Cleaner Slips: Jeremy has removed the “(1 copy, 1 available)” notes for a cleaner presentation and have broken out the location and call number fields into separate lines for better readability. In addition, he has have removed the library name from the slips, since it was redundant.
Garbage handling: CleanSlips will now delete the source Excel spreadsheet upon completion, to keep people’s Downloads folder nice and tidy and allow for easier finding of future spreadsheets.
Comments are OK: In previous versions, if a patron left a comment on the CSU+ request form, it would push all fields forward because of a quirk in how Alma exported its data to Excel. CleanSlips 4.5 accounts for this. Comments can now be turned back on without fear of printing mishaps.
Better Reliability: CleanSlips now creates a second copy of the spreadsheet to work on (and deletes it upon completion). This prevents the errors that occur when users keep their Alma spreadsheets open and try to run CleanSlips at the same time. Now, there are no more conflicts.
Lending Printing Workflow
To print your Bands or Stickers go to Alma and click the large blue Alma button -> Resource Sharing -> Lending Requests. On the Lending Requests page limit the results to items with the Being Processed status using the left hand toolbar. At this point click Print Slip Report on the top right of the web page to create the Excel page needed for printing. A popup will appear asking if you want to print or download the file. To print select User and Excel as shown in the image below: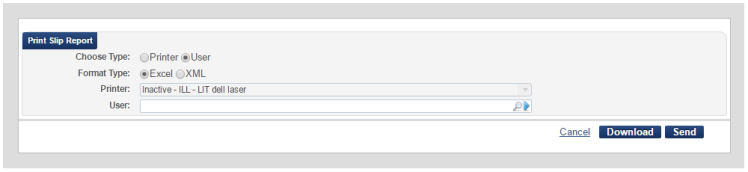
Save the document in a place you will remember. I suggest saving it in the file with the print program.
Now that you have the Excel file run the CleanSlips.exe program to clean the file and merge the data with a word document. Find and select the Excel file you downloaded in the box that pops up from CleanSlips. A word document with the Bands/Stickers/Pull Slips should open automatically after a few seconds. Print the document as you would print any Word document.
Borrowing Flag Printing (Optional)
Some libraries have requested slips of paper to insert into the book with the patrons name popping out the top to make the books easier to find on the hold shelf. Because the Excel file available in the Borrowing page of Alma is a much cleaner format the CleanSlips program is not necessary for this printout. Simply download the Word document with the template you like from the folder below.
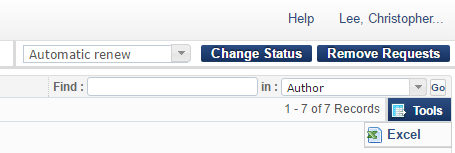
After downloading the Word document in a safe place you will need to connect the document to the Borrowing Requests Excel file. In Alma go to the large blue Alma button -> Fulfillment -> Resource Sharing -> Borrowing Requests. Limit the results to Physically Received By Library and an additional status of Today. This should create a list of requests that you checked into your library and are ready to go to the hold shelf or be transited to the Circulation Desk. In the top right corner of the screen is a blue button labelled Tools. Click the Tools button and select Excel to download the needed file.
Save the Excel file to your desired folder as the same day every day. By saving over the previous days file the Word document will automatically connect to the new file everyday. To connect the files for the first time save and close the Excel file and open the Word document and go to the Mailings tab. Under Mailings click Select Recipients -> Use An Existing List… Find the Excel File you downloaded previously and click Open. You can now preview what the printed items will look like by clicking Preview Results and you can print by clicking Mailings -> Finish & Merge -> Print Documents…
If the Excel and Word documents have been previously merged, and you save the Excel file in the same place with the same name every day, you can print a little bit faster. After downloading the Excel file simply open the Word document and select Yes in the popup that will pop up. You can now preview what the printed items will look like by clicking Preview Results and you can print by clicking Mailings -> Finish & Merge -> Print Documents…
Now cut the slips out and place them in the books before putting them on the shelf!